Modifying Locations
ORDER MANAGEMENT > LOCATIONS
Locations each have their own account and attribute-specific parameters, which may require occasional modifying. Use the following steps to modify a location's address, scope affiliation, custom attributes, operating status, locations hours, delivery / pickup schedules and timeslot and fulfillment options.
Location information appears in your website Store Locator and defines the fulfillment location selection depending on product availability and the fulfillment model your business supports.
Modifying Location Attributes
|
1.
|
Select and click a Location. |
|
2.
|
Click the Attributes tab. |
The Location Information box contains two mandatory fields (identified with red asterisks) Location Name and Time Zone.
Important: When using a Shippo account as a carrier provider and Canada Post is used , or if Canada post is used as a carrier provider, you must enter the Store Manager's name and phone number in the Location Attributes, otherwise, the manifest cannot be created in the Mobile Store Fulfillment.
Be sure to fill out other remaining fields (Description, Phone, Email), if that information is available.
|
3.
|
Click Save or Cancel to abandon changes. |
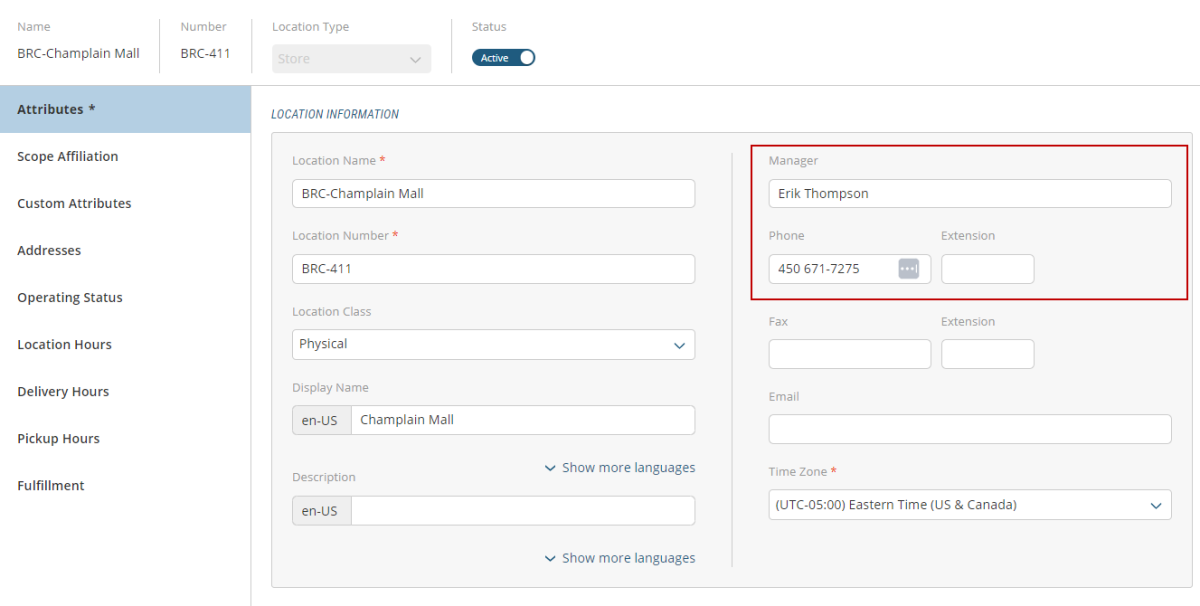
Figure 1 - Locations, Attributes
Setting the location status
Designating a location active or inactive will impact your transactional website. For example, if the location supports pickup in store (BOPIS) or delivery, setting the store to inactive will disable the ability of selecting it when a customer places an order.
|
1.
|
Click the Status toggle to Active or Inactive. |

Figure 2 - Location activity status
Modifying Scope Affiliations
A location must be associated to a scope configured in the commerce model. For warehouse entities only, you can assign multiple scope affiliations. Appropriate user accounts need to be created and bound to the store so the staff are able to fulfill shipments.
Scope Affiliation for Stores
You can assign only one scope when affiliating a scope to a location of type store.
|
1.
|
After a location of type Store has been created, click the Scope Affiliation tab. |
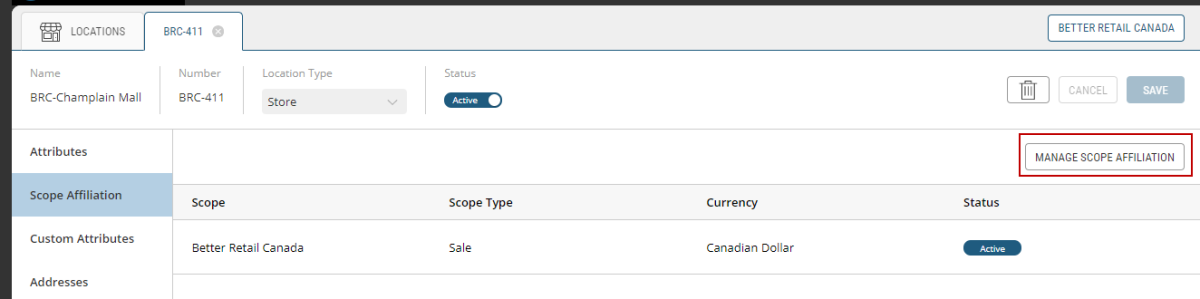
Figure 3 - Scope Affiliation tab
|
2.
|
Click Manage Scope Affiliation to expand the scope tree. |
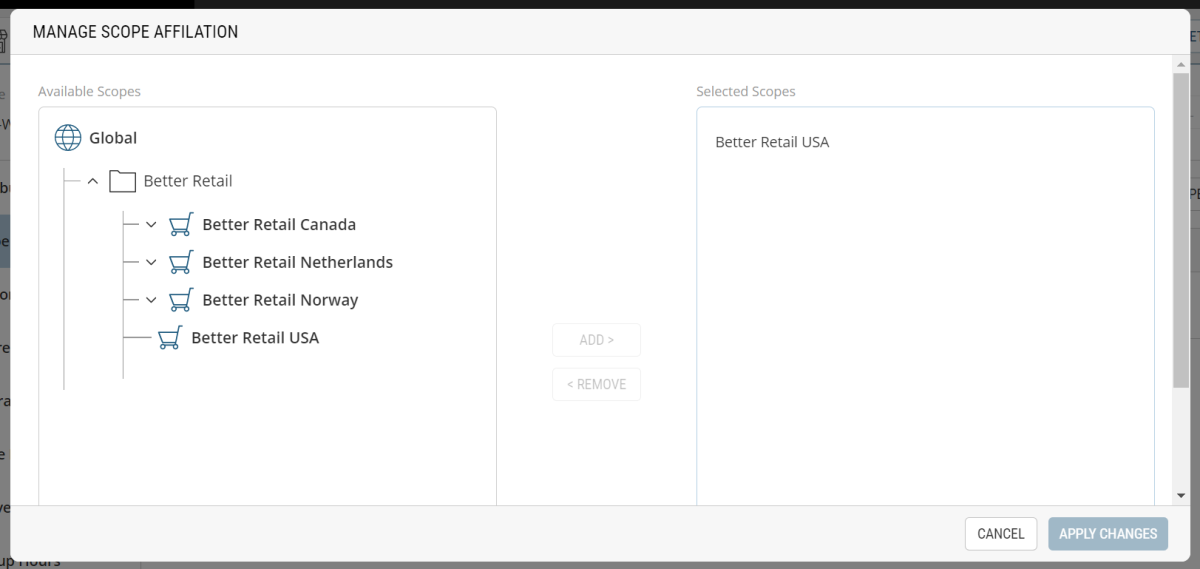
Figure 4 - Associating a scope to a location
|
3.
|
Click the appropriate scope. |
The scope is now associated to the location.
Scope Affiliation for Warehouses
A warehouse can support multiple locations across your business model. You can assign multiple scopes when affiliating a scope to a location of type warehouse, For more information on Commerce Modeler ™ management and configuration, see .
|
1.
|
After a location of type Store has been created, click Scope Affiliation tab. |
|
2.
|
Click Manage Scope Affiliation to expand the scope tree. |
|
3.
|
Click the appropriate scopes (you can add multiple scopes for warehouse entities). |
The scope is now associated to the location.
Customizing Custom Attributes
Custom attributes can be added to a location so that specific settings can be implemented. By default, you will find a list of destination emails to define notifications so the proper audience can be made aware of events happening in this location. For example, you can add individual emails or a mailing list so that store managers are notified when shipment SLAs are about to expire. For more information, see About Destination Notifications
Other than Destination Emails, settings for the Mobile Store Fulfillment application can be configured such as defining the carrier account used for this location and if scanning items to fulfill the picking of a shipment is supported by the location. Any other custom implementation, such as the integration of floorplans in Pick & Pack and Pick & Pack users will also be managed under this tab. You may also find any settings required by custom implementation for your business model.
Setting the scanning options for MSF
|
1.
|
Select a Location from the Locations tab. |
|
2.
|
In the Custom Attributes section, set the Require Scan to pick in MSF toggle to Yes or No. |
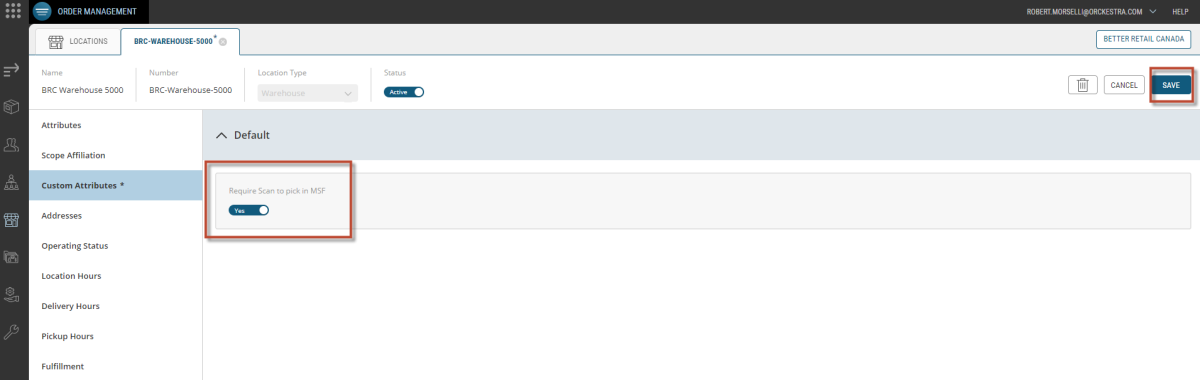
Figure 5 - Require Scan MSF
Configuring Destination Emails
You can find multiple options among the possible attributes configured for your business model. For example, notifications can be configured in order to warn store managers of events that can occur in their stores. To set the destination emails:
|
1.
|
Enter the required emails in the destination fields. |
Note: Individual email addresses and mailing list addresses must be separated by a semi-colon (;) and the destination emails field supports 255 characters- approximately 8 email addresses.
|
2.
|
Click Save to save your modifications. |
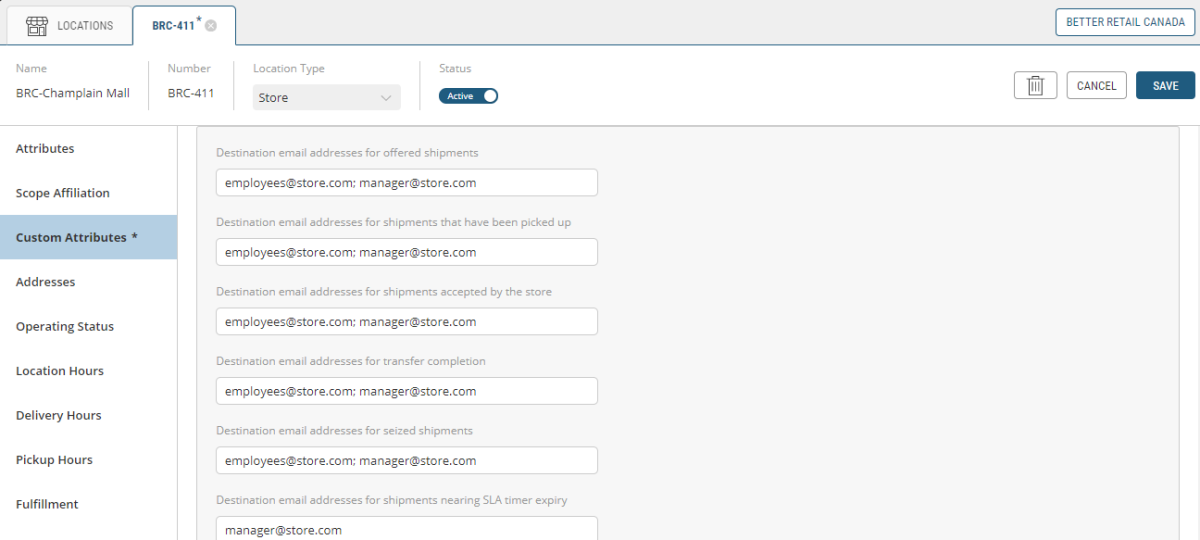
Figure 6 - Email Destination values
Modifying A Location's Address
Follow these steps to modify a location's address:
|
1.
|
Click Location's Address in the Address tab. |
This will bring up the Edit Address window.

Figure 7 - Locations, Click Address
Editing A Location's Address
The Edit Address window contains five mandatory fields (identified with red asterisks).
|
5.
|
Enter ZIP/Postal Code. |
Be sure to fill out other remaining fields (First, Name, Last Name, Phone, Email), if that information is available.

Figure 8 - Locations, Edit Address
Important: Modifying the location address will also impact the store locator and product availability location on your transactional website.
Modifying Operating Status
This tab allows you to override Delivery and Pickup status and set the location's current availability status.
|
1.
|
Using the drop-down menu, you can set the Current Store Status to Open (based on store hours) or, |
|
1.
|
Select Closed (override store hours). |
|
2.
|
Enter Unavailability Reason. |
|
3.
|
Enter Estimated Unavailability Duration Units and Minutes/Hours/Days. |
|
4.
|
Click toggle switch to Delayed. |
Modifying A Location's Status
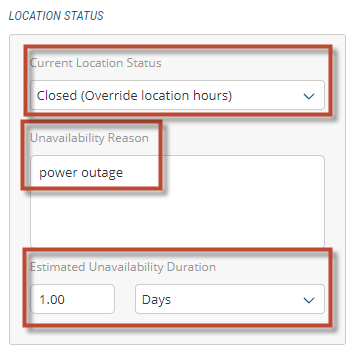
Figure 9 - Locations, Status
Modifying A Location's Delivery Status
A location's delivery status can be modified using drop-down menus.
|
1.
|
Use the Current Delivery drop-down menu to select Available (Based on delivery hours) or, |
|
1.
|
select Unavailable (Override delivery hours). |
|
2.
|
Enter Unavailability Reason. |
|
3.
|
Enter Estimated Unavailability Duration Units and Minutes/Hours/Days. |
|
4.
|
Click toggle switch to Delayed. |
|
6.
|
Enter Estimated Unavailability Duration Units and Minutes/Hours/Days. |
|
7.
|
Click toggle switch to Delayed. |
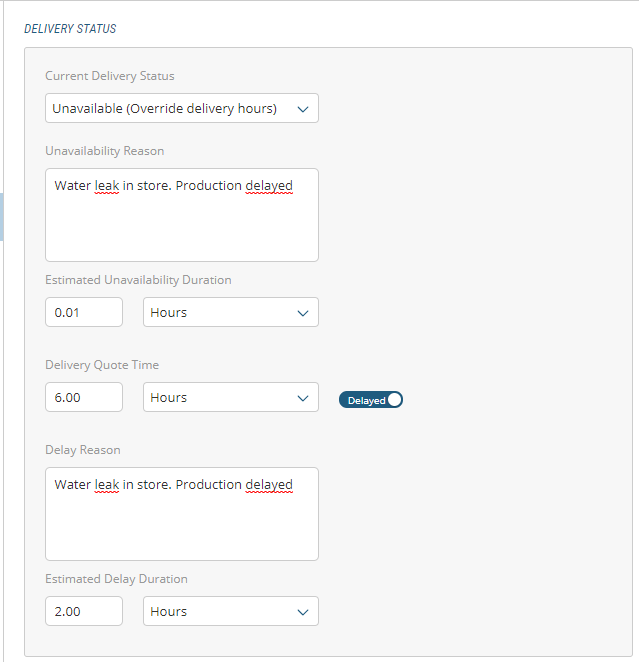
Figure 10 - Delivery delayed
Modifying A Location's Pickup Status
A location's pickup status can be modified using drop-down menus.
|
1.
|
Use the Pickup Status drop-down menu to select Available (Based on delivery hours) or, |
|
1.
|
select Unavailable (Override delivery hours). |
|
2.
|
Enter Unavailability Reason. |
|
3.
|
Enter Estimated Unavailability Duration Units and Minutes/Hours/Days. |
|
4.
|
Click toggle switch to Delayed. |
|
6.
|
Enter Estimated Unavailability Duration Units and Minutes/Hours/Days. |
|
7.
|
Click toggle switch to Delayed. |
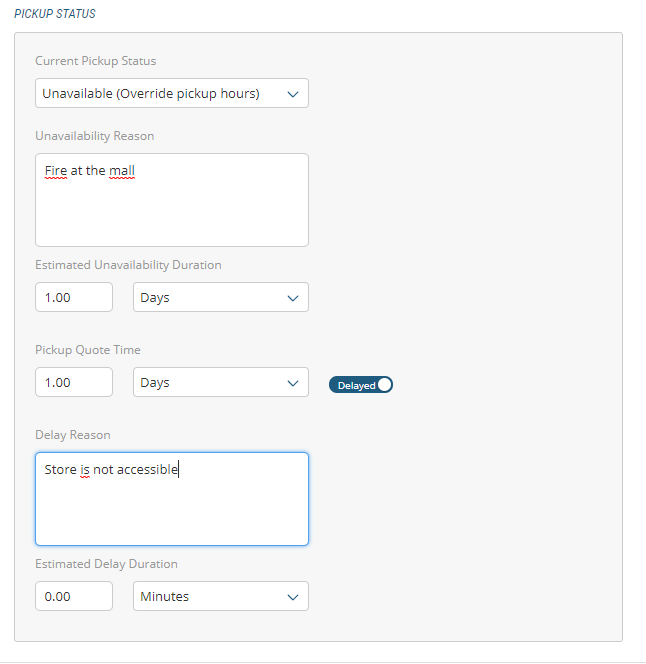
Figure 11 - Locations, Pickup Status
Modifying Location Hours
Use the Location Hours tab to set a location's hours.
Setting REGULAR weekly hours of a location
Employ the following steps to set location hours.
|
1.
|
Select and click a Location in the navigation panel. |
|
2.
|
Select the Location Hours tab. |
|
3.
|
Click the All Day toggle to No. |
A time span row appears with Opening and Closing hour columns.
|
4.
|
In the Opening Hour box, click the Clock icon. |
|
5.
|
Select an Opening time in the time picker. |
|
6.
|
In the Closing Hour box, click the Clock icon. |
|
7.
|
Select a Closing time in the time picker. |
|
9.
|
If you want to add another Open / Close time span for the day, click on the Add icon to the right. |
Another time span row appears.
|
10.
|
Follow steps 3 to 8 to select another time span. |
|
11.
|
Follow Steps 2 to 8 for each day that needs revising. |
Adding an exception to REGULAR location hours
Exceptions to regular store hours are added by specific dates.
|
1.
|
Select and click a Location in the navigation panel. |
|
2.
|
Select the Location Hours tab. |
|
3.
|
At the base of the page, click the Add Exception button. |
An exception row appears.
|
4.
|
In the Name field, enter a name that identifies the exception, New Year's Day, for example. |
|
5.
|
In the Start Date box, click the Calendar icon. |
|
6.
|
Select a Start Date in the date picker. |
|
7.
|
In the End Date box, click the Calendar icon. |
|
8.
|
Select an End Date in the date picker. |
|
9.
|
Click the Recurring box if the closing date repeats on a regular basis. |
|
11.
|
If you need to add another Exception, click the Add Exception button. |
Another exception row will appear.
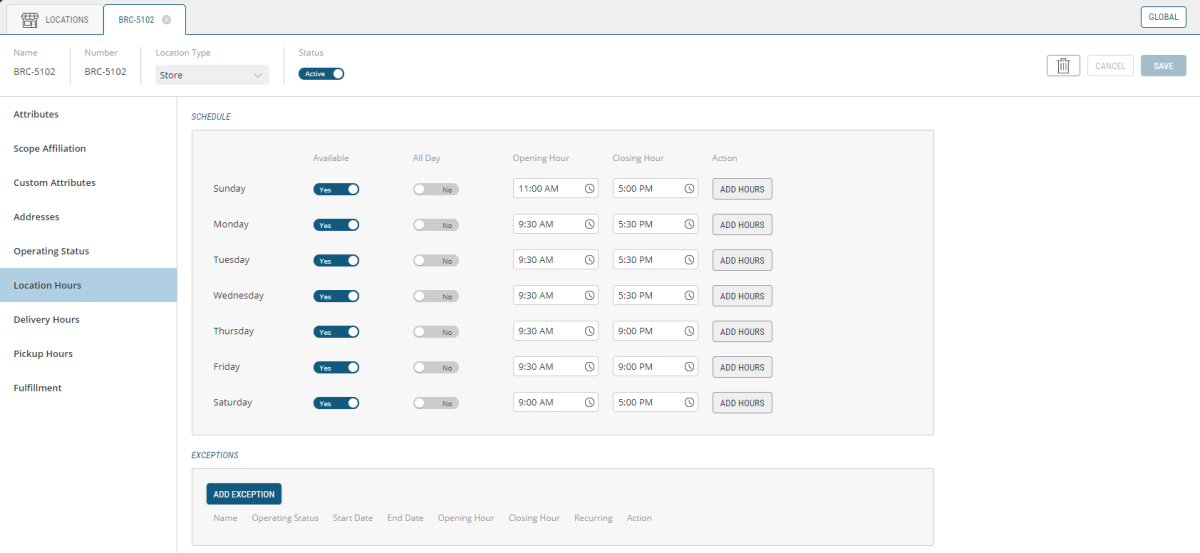
Figure 12 - Locations, Location Hours
Modifying Location Delivery Hours
Follow these steps to set the delivery hours for a physical location.
|
1.
|
Select and click a Location in the navigation panel. |
|
2.
|
Select the Delivery Hours tab. |
|
3.
|
Click the Use Location Hours Schedule for hours that correspond with regular location hours or, |
|
4.
|
Click Enable Timeslots box and then the Manage Delivery Timeslots button to access the timeslot calendar. |
|
5.
|
Click the Appropriate Timeslot in the Manage Timeslots calendar. |
Managing Timeslots and Quotas
When Enable Timeslots is checked, you can specify timeslots and assign a quota for each of them. This can be updated on a weekly basis.
For more information on timeslots and quotas, see Timeslot and Quota Management
Adding a Delivery exception when the location has modified opening and closing hours
Use the following steps if delivery is available, but with modified hours, such as on Black Friday or Boxing Day.
|
1.
|
At the base of the page, click the Add Exception button. |
An exception row appears.
|
2.
|
Click the Operating Status Toggle Switch to Opened. |
|
3.
|
In the Name field, enter a name that identifies the exception, Xmas, for example. |
|
4.
|
In the Start Date box, click the Calendar icon. |
|
5.
|
Select a Start Date in the date picker. |
|
6.
|
In the End Date box, click the Calendar icon. |
|
7.
|
Select an End Date in the date picker. |
|
8.
|
Click the Recurring box if the closing date repeats on a regular basis. |
|
10.
|
If you need to add another Exception, click the Add Exception button. |
Another exception row will appear.
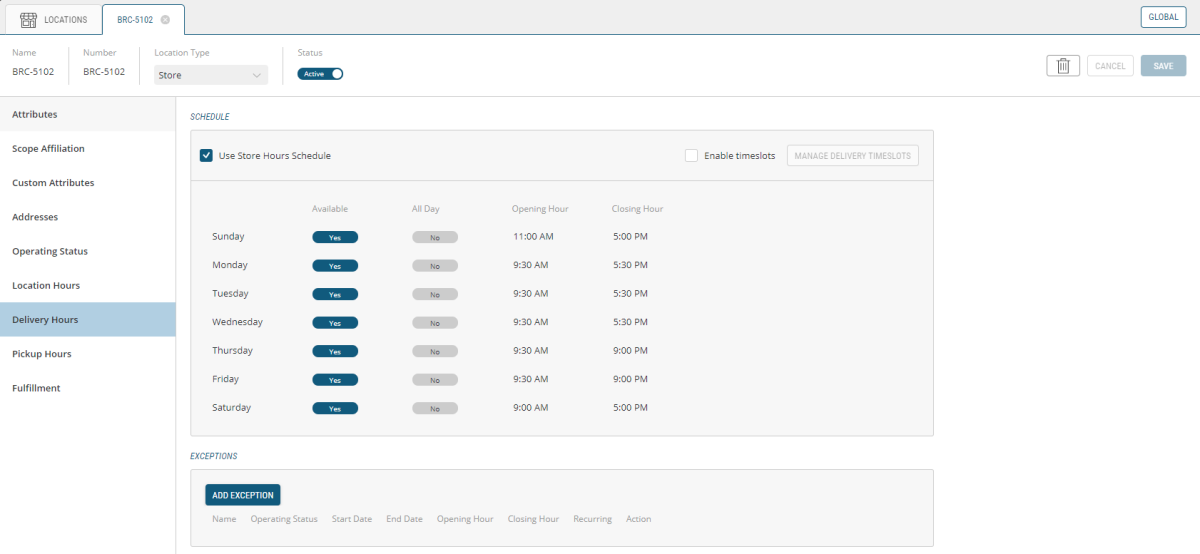
Figure 13 - Locations, Delivery Hours
Modifying Location Pickup Hours
Follow these steps to set the pickup hours for a physical location.
|
1.
|
Select and click a Location in the navigation panel. |
|
2.
|
Select the Pickup Hours tab. |
By default, pickup hours are defined by store hours, so most of the tab's contents are read-only.
If the store is virtual, the following steps do not apply as the Pickup Hours tab is inactive and cannot be modified.
|
3.
|
Click the Use Location Hours Schedule for hours that correspond with regular location hours or, |
|
4.
|
Click Enable Timeslots box and then the Manage Pickup Timeslots button to access the timeslot calendar. |
|
5.
|
Click the Appropriate Timeslot in the Manage Timeslots calendar. |
Adding a Pickup exception when the location has modified opening and closing hours
Use the following steps if a pickup option is available, but with modified hours, such as on Black Friday or Boxing Day.
|
1.
|
At the base of the page, click the Add Exception button. |
An exception row appears.
|
2.
|
Click the Operating Status Toggle Switch to Opened. |
|
3.
|
In the Name field, enter a name that identifies the exception, Xmas, for example. |
|
4.
|
In the Start Date box, click the Calendar icon. |
|
5.
|
Select a Start Date in the date picker. |
|
6.
|
In the End Date box, click the Calendar icon. |
|
7.
|
Select an End Date in the date picker. |
|
8.
|
Click the Recurring box if the closing date repeats on a regular basis. |
|
10.
|
If you need to add another Exception, click the Add Exception button. |
Another exception row will appear.
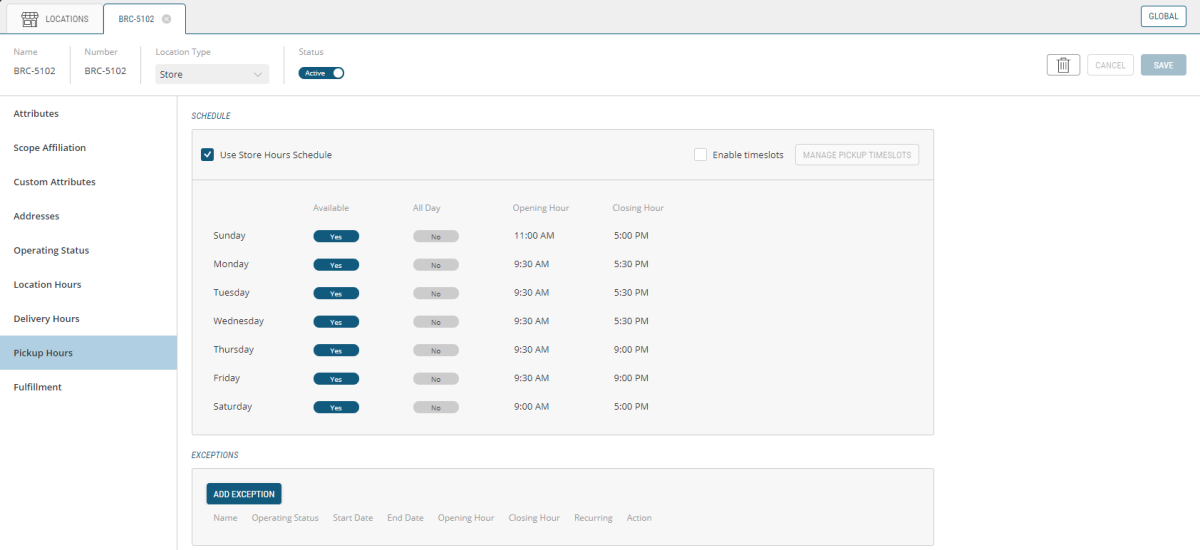
Figure 14 - Pickup Hours, Locations
Managing Timeslots, Quotas and Exceptions
When Enable Timeslots is checked, you can specify timeslots and assign a quota for each of them. You can also This can be updated on a weekly basis or at anytime you need to modify it.
Modifying Fulfillment Options
Fulfillment options are defined by how an order makes its way to the customer. Some options include delivery, ship-to-store, pickup in store and shipping.
Use the following steps to select fulfillment options.
|
1.
|
Select and click a Location. |
|
1.
|
Click the Fulfillment tab to bring up the Fulfillment Options box. |
|
2.
|
Click any of the options that suit customer requirements: |
|
a.
|
Accept Transfer for Pickup |
Fulfillment options
A location can:
|
•
|
Accept Transfers for pickup: enable this option if the location is a pickup location and accepts shipment transfers from a warehouse or another store |
|
•
|
Fulfill for Pickup: select this option if the location also act as a fulfillment location |
|
•
|
Fulfill for Shipping: enable this option if the location fulfills shipments and ship them using carrier providers (Ship from Store) |
|
•
|
Fulfill for Transfer: enable this option if the location fulfills shipments and ships them to other stores (Ship to Store) |
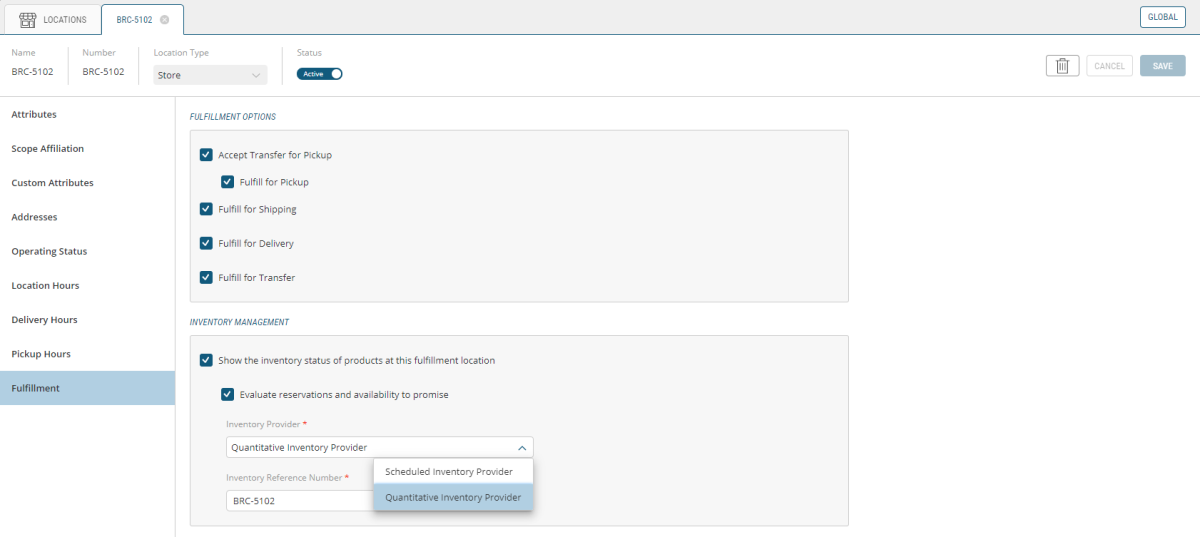
Figure 15 - Fulfillment, Locations
Configuring the inventory settings
From allowing orders to be placed without inventory information to calculating item reservations and availability to promise, the following settings were created to give you the flexibility to meet your inventory needs. Whether your fulfillment locations manage their inventory based on available quantities or scheduled periods of availability, you can use the settings below to determine the extent to which you want the Orchestration Console to manage them.
There is no impact to orders which have been submitted in the past and associated with a store if these options are updated, or if a store is set to inactive or deleted. However, orders being modified might be evaluated again if changes have been made.
|
1.
|
Select and click a Location. |
|
2.
|
Click Fulfillment section. |
|
3.
|
In the Inventory Management box, check/uncheck Show the inventory status of products at this fulfillment location box, make your selection based on these circumstances: |
|
•
|
Yes: The inventory status of line items at this location is visible.
|
|
•
|
No: The inventory status of line items at this location is not visible. |
|
4.
|
Check/uncheck Evaluate reservations and availability to promise box, make your selection based on these circumstances: |
|
•
|
Yes: Reservations and availability to promise will be calculated. |
|
•
|
No: Availability to promise and reservations are not calculated. |
For the two settings below, select Yes if the information being sent to the Orchestration Console is accurate and frequently updated and/or if the Orchestration Console drives most of the orders being captured and can accurately track availability to promise without needing very frequent synchronizations. Select No if you do not manage inventory with the Orchestration Console, if there is no inventory feed sending information to the Orchestration Console or if the feed is updated too infrequently to provide reliable information to your CSRs.
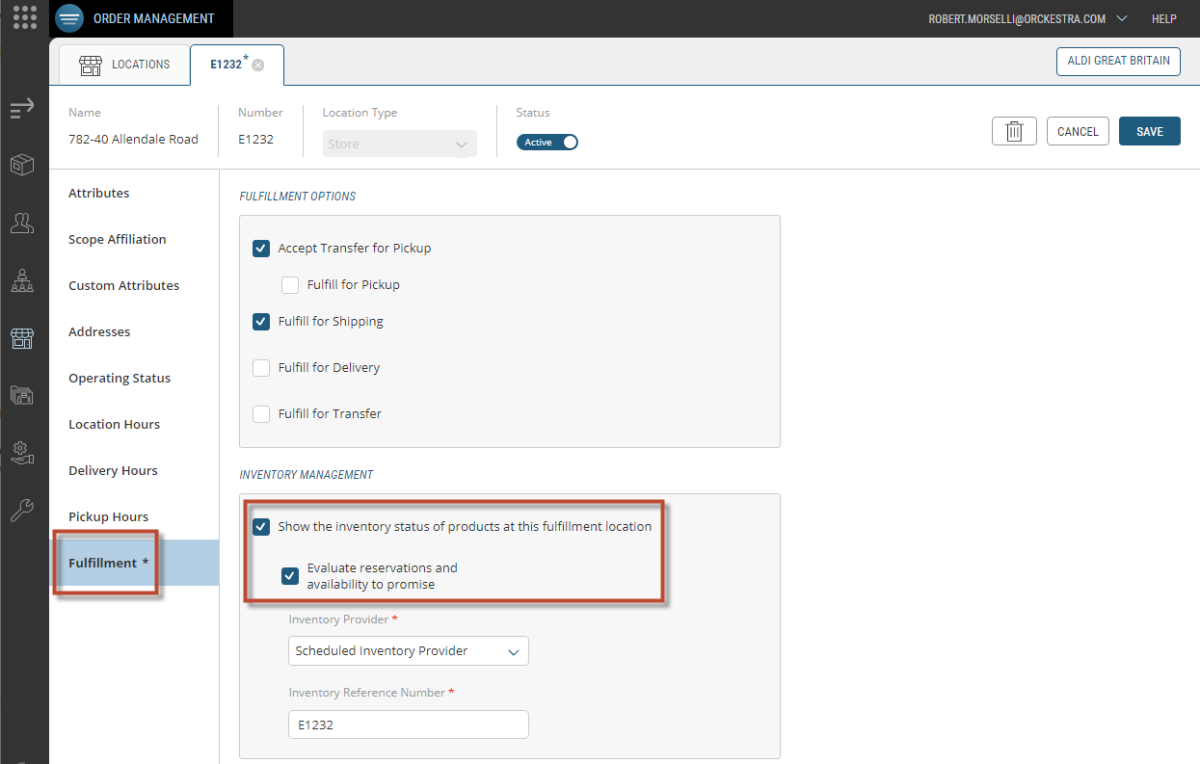
Figure 16 - Locations Inventory Management
|
5.
|
Choose an Inventory Provider (mandatory) from the drop-down menu: |
A Quantitative Inventory Provider evaluates the inventory status of items assigned to this fulfillment location based on current quantities.
A Scheduled Inventory Provider evaluates the inventory status of items assigned to this fulfillment location based on defined schedules.
|
6.
|
Enter an Inventory Reference Number (mandatory) for the Location. |
The reference number is associated with a specific set of inventory data for a unique location.
An inventory provider must be associated with a fulfillment location in order to support inventory tracking. When only one inventory provider is available, it is preselected by default. When no provider is specified the service will attempt to resolve and assign a single registered provider. When no inventory information is provided, inventory management is not set for the fulfillment location.
Custom inventory providers that access external inventory services can be registered with the system during the integration process.
Managing Lead Times and Cutoff Times
Lead times enable grocers and retailers to set the strategy that allows how customers can edit their orders. Essentially, this restricts customers to a specific amount of time to edit their orders on the front-end website, thereby allowing locations to manage the time they'll have to fulfill an order. You can use one of the 2 configurations offered in the platform, lead time and cutoff time.
Lead times are specifically bound to order fulfillment time, whereas a Cutoff Time is a specific time of the day (based on selected timeslots) that orders stop being editable, thereby allowing the fulfillment crew a specific (and reasonable) amount of time to fulfill the order.
Example: to ensure that a shipment isn't modified while it is being picked, the customer can no longer edit their order once the order moves in the fulfillment workflow and reaches the Ready for Pickingstatus.
|
2.
|
Click the Fulfillment tab. |
|
3.
|
Access Fulfillment Transition Settings via the Fulfillment section. |
|
4.
|
Select Fulfillment Transition Type from the drop-down menu. The two options are Fulfillment Cut off Time or Fulfillment Lead Time. |
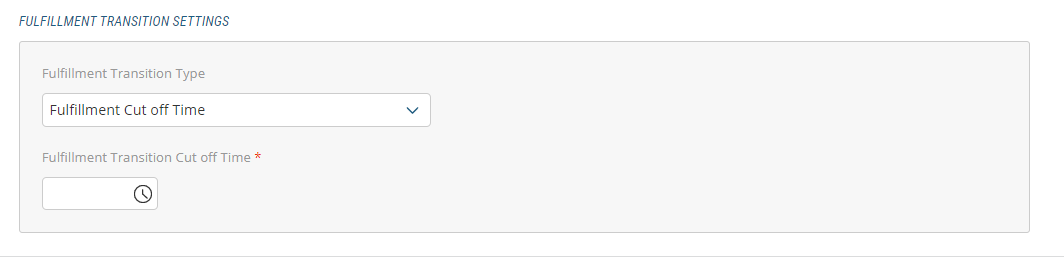
Figure 17 - Fulfillment Transition type
|
5.
|
Enter Fulfillment Transition Settings. |
REFERENCES